

Child Restraint Overview
KeyFit 35 manuals detail crucial safety information, installation guides, and component identification for proper use. Registration is vital for recall notices.
The KeyFit 35 is an infant car seat designed for rear-facing use, prioritizing safety and ease of installation. This manual provides comprehensive instructions, covering everything from initial setup to securing your child correctly. It’s essential to thoroughly review all sections before using the car seat.
Proper registration ensures you receive vital recall notifications. The manual details component identification, weight/height limits, and approved vehicle seating positions. Understanding these guidelines is paramount for optimal child protection during travel.
Registration Information
Promptly completing and mailing the registration card included with your KeyFit 35 is critically important. This ensures you’ll receive immediate notification of any potential safety recalls affecting the car seat. Child restraints can be recalled, and registration is the primary method of communication.
Keep the user guide stored on the bottom of the base for future reference. The manual also requests you note the manufacturing details and serial number for customer service inquiries.

Child Guidelines
KeyFit 35 guidelines specify weight and height limits, alongside age recommendations, ensuring a secure and appropriate fit for your growing child’s safety.
Weight and Height Limits
KeyFit 35 car seats are designed for infants weighing 4-35 pounds and up to 32 inches in height. These limits are crucial for optimal protection during travel. Exceeding these parameters compromises the seat’s ability to function correctly in a crash. Always verify your child’s weight and height before each journey. Regularly checking ensures continued safety as your little one grows. Proper fit within these specifications is paramount for maximizing the car seat’s protective capabilities and maintaining a secure ride.
Age Recommendations
While the KeyFit 35 primarily utilizes weight and height limits, it’s generally recommended for infants from birth until they reach the maximum weight or height restrictions. Typically, this corresponds to around one year old, but individual growth varies. Prioritize weight and height over age when determining continued use. Always consult the manual for specific guidelines. Ensuring a proper fit, based on measurements, is more important than simply adhering to an age range for optimal safety and comfort during travel.

Safe Use Checklist
KeyFit 35 safety relies on pre- and post-installation checks, secure harness adjustments, and adherence to all warnings detailed within the product manual.
Pre-Installation Checks
Before installing the KeyFit 35, carefully review the vehicle owner’s manual and the car seat instructions to ensure compatibility. Confirm the vehicle seat is suitable and free from any damage. Locate and understand your vehicle’s LATCH system or seat belt locking mechanism. Store the user guide on the base for quick reference. Verify the car seat isn’t expired and has all components. Double-check the base installation location is approved within your vehicle, avoiding prohibited areas like seats with active airbags. Proper preparation is key for a secure installation.
Post-Installation Checks
After installing the KeyFit 35, rigorously test its security. Ensure the base doesn’t move more than one inch side-to-side or front-to-back when firmly grasped near the belt path. Verify the LATCH connectors are securely attached, or the seat belt is tightly locked. Confirm the carrier properly attaches to the base with an audible click. Re-check the harness height and belt path are correctly positioned. A stable installation is paramount for child safety; repeat checks periodically.
Important Warnings
Always read the KeyFit 35 manual carefully before use; improper installation risks serious injury. Heed all safety warnings for optimal protection.
General Safety Warnings
Carefully review the KeyFit 35 manual for comprehensive safety guidelines before each use. Never leave a child unattended in the car seat. Always ensure the harness is properly adjusted and secured, preventing ejection during a collision. Regularly inspect the car seat for any signs of damage or wear.
Do not modify the car seat in any way, as this could compromise its safety features. Register your car seat to receive important recall notifications. Prioritize proper installation following the manual’s instructions, and always double-check for secure attachment. Remember, a correctly installed car seat is paramount for your child’s safety.
Installation Warnings
Strictly adhere to the KeyFit 35 manual’s installation instructions for optimal safety. Incorrect installation significantly reduces the car seat’s protective capabilities. Ensure the base is securely attached to the vehicle, utilizing either LATCH or the lap-shoulder belt, verifying a firm, non-moving installation.
Avoid installation in seats with active airbags. Never place the car seat facing forward before the child meets the specified weight and age requirements. Regularly re-check the installation to confirm continued tightness and stability. Improper installation poses a severe risk during a crash.
Usage Warnings
Always follow the KeyFit 35 manual’s guidelines for securing your child. Ensure the harness straps are snug, with no slack, and positioned correctly across the child’s shoulders. Never add aftermarket products or padding that didn’t come with the seat.
Do not leave the child unattended in the car seat. Regularly check the harness for wear and tear. Never use a car seat that has been involved in a moderate to severe crash. Adherence to these warnings is crucial for your child’s safety.

Vehicle Seating Positions
KeyFit 35 manuals specify approved and prohibited vehicle locations for installation, prioritizing rear-facing safety and compatibility with vehicle features.
Approved Vehicle Locations
KeyFit 35 manuals emphasize installing the car seat in the vehicle’s rear seats, as this is the safest location for a child restraint system. Specifically, the rear center seat is often highlighted as the optimal position, offering enhanced protection in a collision. However, if the vehicle lacks a lap-shoulder belt in the center rear seat, installation in either outboard rear seat is permissible. Always consult your vehicle’s owner’s manual to confirm compatibility and proper installation procedures for the chosen location, ensuring a secure and stable fit.
Prohibited Vehicle Locations
KeyFit 35 manuals strictly prohibit installation in any location facing forward before the child reaches the maximum weight or height limits specified for rear-facing use. Furthermore, installation in the vehicle’s front seat, particularly if it’s equipped with an active airbag, is absolutely forbidden due to the severe risk of injury or fatality in a crash. Never place the car seat in areas where it cannot be securely installed according to the manual’s instructions, prioritizing child safety above all else.
Install with Base Setup
KeyFit 35 installation with the base involves identifying components, preparing the vehicle seat, and ensuring a secure attachment for optimal safety.
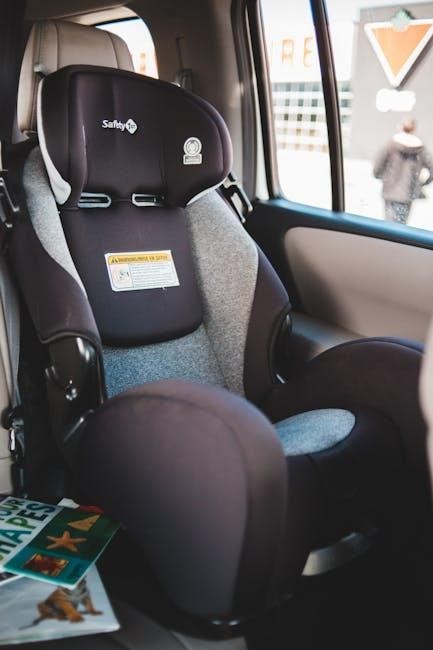
Base Component Identification
KeyFit 35 base components include the base itself, LATCH connectors, belt-locking mechanisms, a recline indicator, and a base release handle. Familiarize yourself with each part before installation. The user guide emphasizes storing it on the base’s bottom. Locate the model and serial numbers on the label for customer service. Understanding these components is crucial for a secure and correct installation, ensuring your child’s safety during travel. Proper identification aids in following the manual’s instructions effectively, minimizing installation errors and maximizing protection.
Preparing the Vehicle Seat
Before installing the KeyFit 35 base, carefully prepare the vehicle seat. Ensure the seat is clean and free of debris. Consult your vehicle’s owner’s manual for compatibility and any restrictions regarding child restraint installation. Verify the seatbelt or LATCH system functions correctly. The manual stresses proper vehicle seat preparation for optimal base stability. A correctly prepared seat provides a secure foundation, maximizing the car seat’s protective capabilities and ensuring a safe and reliable installation process for your child’s wellbeing.
Install Using LATCH
KeyFit 35 installation with LATCH involves securely attaching connectors to the vehicle’s anchors, ensuring a tight fit, and confirming proper engagement.
LATCH Connector Attachment
KeyFit 35 LATCH connector attachment requires locating the vehicle’s lower anchors. Push the connectors onto the anchors until they click, confirming a secure connection. Ensure both connectors are firmly attached before proceeding. Avoid twisting or cross-threading the connectors. The manual emphasizes checking for a solid connection by pulling upwards on the base near the LATCH connectors. A properly installed base will have minimal movement—less than one inch side-to-side or front-to-back. Always consult your vehicle’s owner’s manual for specific LATCH anchor locations and weight limits.
LATCH Tightening Procedures
KeyFit 35 LATCH tightening involves pulling the LATCH strap to remove slack, securing the base firmly to the vehicle seat. Continue tightening until the base is installed snugly, with minimal movement—less than one inch side-to-side or front-to-back. Avoid over-tightening, which could damage the vehicle’s anchors. The manual stresses checking the tightness by firmly grasping the base near the LATCH connectors and attempting to move it. A secure installation is paramount for child safety; re-check tightness before each use.
Install Using LAP-SHOULDER BELT
KeyFit 35 installation with a lap-shoulder belt requires proper belt path routing and engaging the vehicle’s locking mechanism for a secure fit.
Belt Path and Locking Mechanism
KeyFit 35 installation using a lap-shoulder belt necessitates understanding the vehicle’s seat belt system; Route the belt through the designated paths on the child restraint, as illustrated in the manual. Crucially, engage the vehicle’s locking mechanism – either a latch plate or a switch – to firmly secure the belt.
Without a locked belt, the car seat won’t be properly restrained in a crash. Confirm the belt is locked by attempting to pull it tighter after installation; it should not move. Refer to your vehicle owner’s manual for specific locking instructions, as mechanisms vary.
Tightening with Lap-Shoulder Belt
KeyFit 35 installation with a lap-shoulder belt requires significant force to achieve a secure fit. After routing and locking the belt, firmly press down on the car seat while simultaneously pulling the slack from the belt. Continue this process until the car seat moves less than one inch side-to-side or front-to-back at the belt path.
A properly tightened installation minimizes movement during a crash. Regularly check tightness, especially after vehicle use. Remember, a snug fit is paramount for optimal child safety. Consult the manual’s illustrations for visual guidance.

Install Using LAP BELT ONLY
KeyFit 35 installation using only a lap belt requires careful routing and secure tightening, ensuring minimal movement and a stable base for safety.
Lap Belt Installation Procedure
KeyFit 35 lap belt installation begins by threading the belt through the designated paths on the child restraint base. Ensure the belt lies flat and isn’t twisted. Next, firmly push the base into the vehicle seat, applying weight to achieve a tight fit. Lock the lap belt by pulling the shoulder belt portion all the way out, then slowly retracting it until it clicks. This engages the locking latch plate. Double-check that the belt is securely locked and cannot be loosened by pulling on it.
Securing the Belt
KeyFit 35 security relies on a properly locked lap belt. After threading and tightening, confirm the belt’s locking mechanism is engaged – typically a click sound indicates success. Apply significant downward force on the base while simultaneously pulling upward on the belt near the buckle to verify a secure installation. Minimal movement (less than one inch) is crucial. Regularly re-check the belt’s tightness, especially before and during travel, to maintain optimal child safety throughout the journey.

Install Carrier to Base
KeyFit 35 carrier attachment requires aligning and firmly pressing the carrier onto the base until an audible click confirms a secure connection.
Attaching the Carrier
To properly attach the KeyFit 35 carrier to the base, align the carrier with the base, ensuring it’s facing the correct direction. Firmly press down on the carrier until a distinct, audible click is heard on both sides. This confirms a secure connection between the carrier and the base. Always verify the connection by attempting to gently lift the carrier off the base; it should not move. A secure attachment is paramount for child safety during travel, so double-check before each journey.
Audible Click Confirmation
A clear, audible “click” sound on both sides of the KeyFit 35 carrier is essential when attaching it to the base. This confirms the carrier has properly locked into place, providing a secure connection. If only one side clicks, or no clicks are heard, re-attempt the attachment process. Never assume a secure fit without confirming the audible clicks. Regularly check the connection before each trip to ensure continued safety for your child during vehicle travel.

Adjusting Harness Height
Harness height must be adjusted as your child grows, utilizing indicators to ensure proper shoulder placement for optimal safety and comfort.
Harness Height Indicators
KeyFit 35 car seats feature harness height indicators to simplify adjustments as your child develops. These indicators visually demonstrate whether the harness is positioned correctly relative to your child’s shoulders. The harness should be at or just below the shoulders for a rear-facing infant.
As your child grows, move the harness straps to the next set of slots, ensuring the shoulder straps remain appropriately positioned. Regularly checking these indicators guarantees optimal safety and a comfortable fit throughout your child’s growth stages within the car seat.
Adjusting for Growing Child
As your child grows, regularly adjust the KeyFit 35 harness height to maintain optimal safety and comfort. Utilize the harness height indicators to ensure the straps are at or just below the shoulders when rear-facing. For forward-facing, position straps at or above the shoulders.
Re-thread the harness straps through the appropriate slots as needed. A properly adjusted harness is snug and secure, preventing your child from slipping or experiencing discomfort during travel. Consistent adjustments are crucial for continued safety.

Securing Child with Harness
KeyFit 35 harnesses require proper buckling and tightening procedures to ensure a secure fit. Always check for a snug harness before each trip.
Harness Buckling Procedure
To properly buckle the harness, first ensure the harness straps are free of twists. Insert the harness buckle’s tabs fully into the corresponding buckle receiver until a distinct click is heard. Verify both sides are securely latched. The chest clip should be positioned at armpit level, ensuring it’s closed to properly position the harness straps. Finally, always perform a pinch test to confirm the harness is snug enough; if you can pinch any excess webbing at the child’s shoulder, tighten the harness further.
Harness Tightening
Achieving a secure fit requires proper harness tightening. After buckling, pull the harness adjustment strap firmly to remove any slack. The harness should be snug enough that you cannot pinch any excess webbing at your child’s collarbone. Ensure the straps lie flat and are not twisted. Regularly check the tightness, especially as your child grows, and readjust as needed to maintain a secure and comfortable fit throughout each journey. A properly tightened harness is crucial for safety.

Cleaning and Maintenance
Regular cleaning and upkeep, as outlined in the manual, ensure the KeyFit 35 remains safe and functional for your child’s travels.
Cleaning Instructions
The KeyFit 35’s cover is removable and machine washable, using mild detergent and a gentle cycle, then air dried. The harness straps should be cleaned with a damp cloth and mild soap; avoid harsh chemicals. The plastic components can be wiped clean with a damp cloth as well.
Do not use abrasive cleaners or bleach, as these can damage the car seat’s materials. Ensure all parts are completely dry before reassembling and using the car seat. Regular cleaning helps maintain hygiene and extends the lifespan of your KeyFit 35.
Maintenance Schedule
The KeyFit 35 requires regular checks to ensure optimal safety. Inspect the harness straps and buckles for wear and tear before each use. Periodically examine the shell for cracks or damage. Clean the car seat frequently, as detailed in the cleaning instructions, to remove spills and debris.
It’s recommended to review the full manual annually to refresh your understanding of proper installation and usage. Replace the car seat after any accident, even a minor one, and after the expiration date.